Tuesday, April 10, 2012

Kowalski_tips n tricks: Flip, Rotate and Mirror Designs and Patterns in Photoshop


This tutorial consists of flipping, mirroring and rotating the same image over and over again to create a cool pattern! We'll also explore photoshop's layer blend modes.


You can choose any photo but I suggest using a photo with an already interesting pattern or design, like a tree for example.

Before starting: Make a copy of your image and work on the copy just in case you need to go back to the original. You may also want to work in full-screen mode.

Step 1: Crop away any unwanted areas of the photo by using the crop tool.
Step 2: Make a copy of your layer. Layer > Layer via Copy

Step 3: Double the width of the canvas size. Image > Canvas Size. To force extra canvas space to the right side of the photo, click on the left middle square in the Anchor grid:


Step 4: Hold down your shift key and drag the copy to the right.


Step 5: Flip the image on the right horizontally. Edit > Transform > Flip Horizontal

Step 6: Merge the two layers together. Layer > Merge Down - You'll notice in your Layers palette the two layers merged into a single layer.

Step 7: Duplicate the layer. Command+J


Step 8: Double the height of the canvas. To force extra space to appear below the image, click on the top middle square of the Anchor grid:


Step 9: Drag the imagine on Layer 1 below the original while holding down the shift key.


Step 10: Flip the bottom image vertically. Edit > Transform > Flip Vertical


Step 11: Merge both layers onto a new later. Hold down the Option key and go to Layer > Merge Visible.

Holding down the option key tells Photoshop to merge our existing layers on to the new layer.


Step 12: Rotate the new layer 90 degrees. Edit > Transform > Rotate 90 CW


Step 13: Crop the document around the rotated image. Hold down the Command key and click directly on the preview thumbnail for your rotated layer in the Layers palette:


This will place a selected outline around the rotated image in the document. With the selection outline in place, do Image > Crop.


After cropping, use Command+D to remove the selection outline.


Step 14: Change the layer blend mode. This is example of using the Darken blend mode:


Step 15: Merge both layers onto a new layer. Once again, hold Option and Layer > Merge Visible.

A new merged layer appears.


Step 16: Rotate the new layer 45 degrees. Edit > Transform > Rotate. The Options Bar (below) along the top of the screen will change to display options. Enter 45.0 in the Angle box.

Press enter and press enter again to exit out the rotate command.


Step 17: Change the blend mode. This is an example for lighten:

The result is at the top of this post.


Klimitchek_proj5_article_Research+thumbs


Southampton Marks Titanic Milestone, 100 Years After Setting Sail
By GLEN LEVY | @glenjl | April 10, 2012 |Time Magazine
+

It was exactly 100 years ago, on Tuesday April 10, 1912, when the Titanic sailed from the English port city of Southampton. In honor of the ships first and final voyage, descendants of those on board and the public met for a ceremony at the exact same place where the Titanic set sail. Southampton was home to more than a third of the more than 1,500 people who died when the ship hit an iceberg and sank on April 15, 1912, during its voyage to New York. Those who gathered threw flowers and wreaths into the water, before a minute of silence. I would like to have an image that merges the past and present events. Idea 1: have the scenes from titanic in which the ship is going down and the thousands of people are in the water flailing for help and it will be merged with an image of the descendants throwing them flowers.
Idea 2: have the titanic as its leaving port on an image of the present day ceremony in which the ship is kind of ghostly with all the people waving goodbye and then on the dock will be the decedents throwing flowers in their memory.
The images of Titanic I’ll get from the Internet. I may even get photos from the actual ceremony. I could do original sketches of flowers that are thrown into the water at the ceremony. My original photo would be of some of the people attending the ceremony or even some of flowers being tossed. That’s the plan so far J

Klimitchek_tipsandtricks


This youtube video will show you step by step on how to make teeth into fangs.
Step 1: upload photo of teeth
Step 2: use the polygonal lasso tool to select the tooth you want to be a fang
Step 3: go under select – then modify- then feather …feather radius:1 pixel click OK
Step 4: make new layer via copy
Step 5: go under edit- then transform- then warp
Use the warp tool to click and drag the tooth into a fang. TA DA!

Hollingsworth_Tips and Tricks


Ghostly Blur Text Effect


Start with your text typed in white in front of a solid black background.The original Photoshop document. Image © 2011 Photoshop Essentials.com.

In the Layers panel, the Type layer should be above the black Background layer:
A Type layer in Photoshop. Image © 2011 Photoshop Essentials.com.

Select the Type layer in the Layers panel, then go up to the Layer menu in the Menu Bar along the top of the screen, choose Rasterize, then choose Type:
The Rasterize Type command in Photoshop. Image © 2011 Photoshop Essentials.com.

"Rasterizing" type just means we're converting it from editable text into pixels, which we need to do before Photoshop will let us apply any filters to it. Nothing will look changed in the document window, but in the Layers panel you can see that the Type layer changed to a normal pixel-based layer:
The type has been rasterized in Photoshop. Image © 2011 Photoshop Essentials.com.


Make three copies of the rasterized text by going up to the Layer menu, choose New, then choose Layer via Copy, or press Command+J to access the same command with the keyboard shortcut:
The New Layer via Copy command in Photoshop. Image © 2011 Photoshop Essentials.com.

Place the layer above the original:
Blur copy. Image © 2011 Photoshop Essentials.com.

Do the same thing two more times and when you're done, you should have 4 text layers, plus the Background layer on the bottom:
Five layers in the Layers panel. Image © 2011 Photoshop Essentials.com.


Click on the original text layer in the Layers panel (the one directly above the Background layer):
Selecting the original text layer in the Layers panel. Image © 2011 Photoshop Essentials.com.


Go up to the Filter menu at the top of the screen, choose Blur, then choose Motion Blur:
Selecting the Motion Blur filter in Photoshop. Image © 2011 Photoshop Essentials.com.

Change the Angle of the blur to 90°, then begin dragging the Distance slider at the bottom of the dialog box towards the right to increase the amount of blurring. I set my Distance value to 150 pixels:
The Motion Blur dialog box in Photoshop. Image © 2011 Photoshop Essentials.com.

When you're done, click OK to close out of the dialog box. Your vertical motion blur effect should look similar to this:
A vertical motion blur effect has been added to the text. Image © 2011 Photoshop Essentials.com.


Click on the layer above the original text layer in the Layers panel (the layer that says "copy" after its name):
Selecting the copy of the text layer. Image © 2011 Photoshop Essentials.com.


Press Command+Option+F on your keyboard to access the last filter we used. This time, add a horizontal motion blur, so change the Angle to 0°:
Changing the Angle in the Motion Blur dialog box in Photoshop. Image © 2011 Photoshop Essentials.com.

Click OK to close out of the dialog box:
Horizontal and vertical motion blur has been added to the text. Image © 2011 Photoshop Essentials.com.

Wells_tips and tricks

Here i am going to show you how to create realistic rain effect using photoshop CS, this tutorial is suitable for immeadiate beginners too,
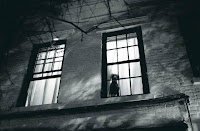
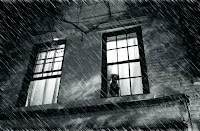
now the first thing you need is to get a good source image , i used this house which is shown at a kool angle and a dog lookin out of the window supposedly because it is raining....


Duplicate the layer ( press Ctrl+J ) or just drag the layer to the create new layer button at the bottom of layers tool box ,

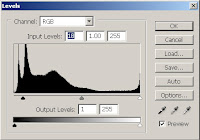
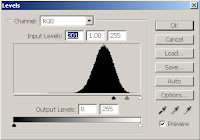
Now go to Image > Image Adjustments > Levels and make your settings as shown in the image below ...


Even tough the image we have is already dark ,that would have given the image the necessary dark appearance as you would have on a rainy day ..

The next step is to create rain
Create a new layer (Shift+CTRL+N) with a white background and name it rain for easy reference later

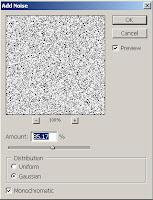
Now go to Filter > Noise > Add Noise and make your settings as shown in the image below ....


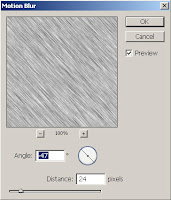
Now go to Filter > Blur > Motion Blur and make your settings as shown in the image below ..


Now go to Image > Image Adjustments > Levels and make your settings as shown ....


Go to layers pallet and change your blending mode to screen
well we got it raining already but i just want it to rain more heavily so make another copy of the rain layer, set the blending mode to screen on this layer too
and go to Edit > Transform > Rotate 180 degrees clockwise and reduce the opacity of the layer to around 82,
now with the topmost layer selected press Crl+E to merge the two top layers

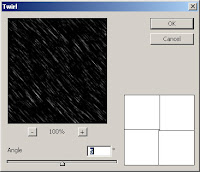
Now it rains but we dont have any wind , so our rain is not realistic yet , now go to Filter > Distort > Twirl and make the settings as shown below ....


Final Product

Monday, April 9, 2012

Hanson_tips/tricks

How to make simple smokey text.


Step 1. Go to Layer > Layer Style > Gradient Overlay. Choose a gradient using the Radial style and adjust the size as you please. 

Step 2. Add text then go to Filter > Blur > Motion Blur. Use 90 degrees for the angle and 40 pixels for the distance. 


Step 3. Go to FIlter > Distort > Wave. Use 3 for number of Generators, 10 and 346 for the wavelength, and 5 and 35 for the Amplitude.


Step 4. Go to Filter > Blur > Gaussian Blur. Use 10 pixels for the Radius.


Step 5. Create a new layer on top and go to Filter > Render > Clouds. Then Lower the opacity until you have the desired affect. 


Final Output.


Exercise 10: Photoshop Tips and Tricks

There are a gazillion things you can do in Photoshop. Obviously, we don't have the time to cover all of it. For Exercise 10 you will post and demonstrate in class a Photoshop tip or trick. In the blog, write step by step instructions along with supporting images. You may also include a link to a YouTube video or blog but this CANNOT be your primary post. You must write out and explain the steps yourself.

Be prepared to demonstrate it for next class (bring appropriate files, etc.)

Please label your post "tips and tricks"

Prof Newton